3D Touch
2016 - 02 - 02
Posted by chengway
苹果在 iPhone 6s 与 iPhone 6s Plus 上推出了 3D Touch 功能,不同于以往,这次的新 feature 是对开发者开放的,你也可以在自己的 App 上部署 3D Touch,API 层面上的变化主要是下面三点:
- UITouch 现在有了
force属性,可以识别按压力度了 - UIViewController 扩展了一系列 API,允许你的 ViewController 以一个预览的方式展示(peek),当用户持续重压屏幕则会全屏展示(pop)
- UIApplicationShortcutItem 是一个全新增加的类,增加一些可以执行的动作,然后你可以在 iPhone 主界面重压程序图标快捷执行。
UITouch force
UITouch 有了一个新的属性 force,他值的范围(CGFloat)从 0 到 maximumPossibleForce(新添加的属性),通常值为 1 表示一个平均的压力水平。
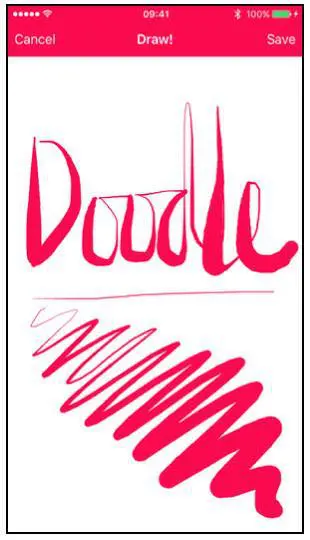
现在你可以实现一个画板 App,画布对按压力度敏感,力度越大笔画越粗,反之越细。
下面的方法实现了划线这一步骤,注意他带三个参数:起点、终点、力度(默认为1,稍后我们会从 UITouch 的 force 属性中获取真实的值)
extension Canvas {

  private func addLineFromPoint(from: CGPoint, toPoint: CGPoint, withForce force: CGFloat = 1) {

    UIGraphicsBeginImageContextWithOptions(bounds.size, false, 0.0)

    drawing?.drawInRect(bounds)

    let cxt = UIGraphicsGetCurrentContext()
    CGContextMoveToPoint(cxt, from.x, from.y)
    CGContextAddLineToPoint(cxt, toPoint.x, toPoint.y)

    CGContextSetLineCap(cxt, .Round)

    CGContextSetLineWidth(cxt, 2 * force * strokeWidth)

    strokeColor.setStroke()

    CGContextStrokePath(cxt)

    drawing = UIGraphicsGetImageFromCurrentImageContext()

    layer.contents = drawing?.CGImage

    UIGraphicsEndImageContext()

  }
}
在 touchesMoved(_:withEvent:) 中判断当前设备是否支持 3D Touch,支持就从 touch 中获取真实的 force,不支持 force 就默认设为 1(前面已经设好了)
if traitCollection.forceTouchCapability == .Available {
  addLineFromPoint(touch.previousLocationInView(self),
    toPoint: touch.locationInView(self), withForce: touch.force)
} else {
  addLineFromPoint(touch.previousLocationInView(self),
    toPoint: touch.locationInView(self))
}
现在你可以随心所欲地画画了
Peeking and popping
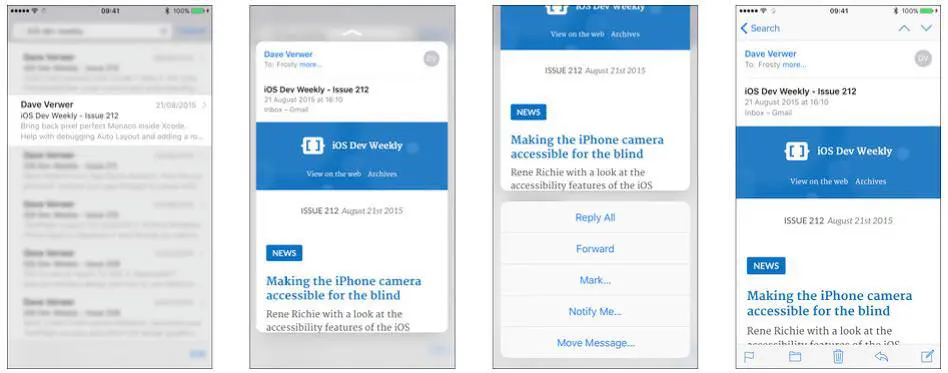
在支持 3D Touch 的设备上,View Controller 随着按压力量的增加,会有三个交互阶段:
- 暗示预览功能可用,会有一个虚化的效果
- Peek:重按一下后出现的预览,展示预览的视图以及快捷菜单,手指向上滑动,界面会展示几个 action 供选择
- Pop:跳转到预览的视图控制器,是在Peek后进一步按压后进入预览的视图控制器
前面我们已经提到,iOS 9 的 View Controller 已经添加了 3D Touch API 支持,下面的代码首先判断了设备是否支持 3D Touch,registerForPreviewingWithDelegate(_:sourceView:) 是 iOS 9 新增的 API,见名思义,注册一个 view controller 参与 3D Touch 的预览 peek 和 pop
if traitCollection.forceTouchCapability == .Available {
  registerForPreviewingWithDelegate(self, sourceView: view)
}
该方法带两个参数,delegate 通过实现 UIViewControllerPreviewingDelegate 来协调展示 preview VC,sourceView 表示需要回应 3D Touch 的 view
回顾上图所示,我们在 TableView 上实现按压 cell 弹出 preview,所以我们就在 TableView Controller 上实现这个方法,那么 sourceView 也就是 tableView
既然指定了 self 是 delegate,下面要实现 UIViewControllerPreviewingDelegate 方法
extension DoodlesViewController:
  UIViewControllerPreviewingDelegate {

  func previewingContext(
    previewingContext: UIViewControllerPreviewing,
    viewControllerForLocation location: CGPoint)
    -> UIViewController? {
    // peek!
    return nil
  }

  func previewingContext(
    previewingContext: UIViewControllerPreviewing,
    commitViewController viewControllerToCommit:
    UIViewController) {
    // pop!
  }
}
1.第一个 delegate 方法 previewingContext(_:viewControllerForLocation:) 带两个参数:
location表示 3D Touch 发生的位置,你根据该参数判断那个 view 被按压previewingContext是一个UIViewControllerPreviewing实例,这个类有两个属性比较有用:- sourceView:就是你之前从
registerForPreviewingWithDelegate(_:sourceView:)方法中传递进来的 view - sourceRect:表示可以按下去的尺寸,这里为一个 cell 的 frame
- sourceView:就是你之前从
这个 delegate 返回一个被 preview 展示的 view controller
2.第二个 delegate 方法 previewingContext(_:commitViewController:) 当用户按压力度更大触发 pop 时被调用,该方法同样带两个参数,一个与上面相同,另一个 viewControllerToCommit 来自于上面 delegate 方法的返回值,即将要被展示的 VC。当用户持续重压,由 preview 转到全屏展示,也是会显示这个 VC
现在来完善这两个方法:
extension DoodlesViewController:
  UIViewControllerPreviewingDelegate {

  func previewingContext(
    previewingContext: UIViewControllerPreviewing,
    viewControllerForLocation location: CGPoint)
    -> UIViewController? {

    // 1
    guard let indexPath =
      tableView.indexPathForRowAtPoint(location),
      cell = tableView
        .cellForRowAtIndexPath(indexPath) as? DoodleCell
      else { return nil }

    // 2
    let identifier = "DoodleDetailViewController"
    guard let detailVC = storyboard?
      .instantiateViewControllerWithIdentifier(identifier)
      as? DoodleDetailViewController else { return nil }
    detailVC.doodle = cell.doodle

    // 3 这样当 cell 被持续按压的话,tableView 其余的地方就会变模糊
    previewingContext.sourceRect = cell.frame
    // 4
    return detailVC
  }

  func previewingContext(
    previewingContext: UIViewControllerPreviewing,
    commitViewController viewControllerToCommit:
    UIViewController) {

    showViewController(viewControllerToCommit, sender: self)
  }
}
Preview view controller 通常会显示一个默认的尺寸,但是你可以通过覆盖
preferredContentSize属性来修改
Apple 已经为一些控件实现了 peek 和 pop,比如 UIWebView 和 WKWebView,你只需要将他们的 allowsLinkPreview 属性设为 true 即可
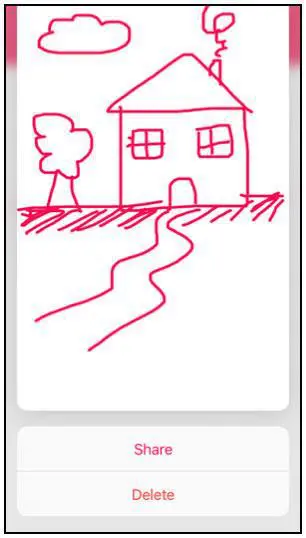
Preview actions
前面我们提到在 peek 展示 preview 阶段,用户手指不离开屏幕向上滑动,会显示一些操作按钮。实现起来也很简单,在将会被 preview 展示的 VC (即最终会被 pop 到屏幕上的 VC)上实现 \- previewActionItems 方法
override func previewActionItems() -> [UIPreviewActionItem] {
  // 1
  let shareAction = UIPreviewAction(title: "Share",
    style: .Default) {
    (previewAction, viewController) in
    if let doodlesVC = self.doodlesViewController,
      activityViewController = self.activityViewController {
      doodlesVC.presentViewController(activityViewController,
        animated: true, completion: nil)
    }
  }

  // 2
  let deleteAction = UIPreviewAction(title: "Delete",
    style: .Destructive) {
    (previewAction, viewController) in
    guard let doodle = self.doodle else { return }
    Doodle.deleteDoodle(doodle)
    if let doodlesViewController = self.doodlesViewController {
      doodlesViewController.tableView.reloadData()
    }
  }
  return [shareAction, deleteAction]
}
上面分别用 UIPreviewAction 创建了两个 preview action:分享和删除操作
UIPreviewAction类似于UIAlertActions,你还可以使用 UIPreviewActionGroup 将他们分组,也就是说一个 group 可以包含多个 action,当你点击这个 group ,会打开个子菜单提供一些 actions 供你选择。
因为这个 preview action 方法最终是要由 containerVC(doodlesViewController) 来执行,在这里我们仅仅是在 preview VC 中保留了 containerVC 的一个引用(注意是 weak 的),当然你也可以用代理这种设计模式来解耦。
Home screen quick actions
最后一个关于 3D Touch 的特性是可以在手机主屏,重压 App 图标弹出一个菜单来快速执行一些操作
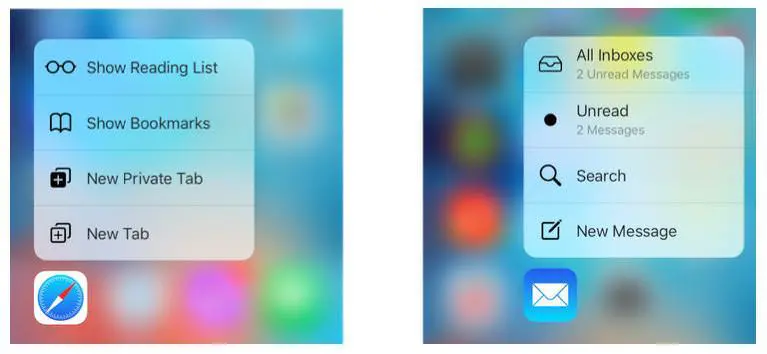
每个 App 图标可以添加四个 action,每个 action 分成两种类型:
- Static shortcuts: Static shortcuts 在 Info.plist 中定义,随 App 安装生效
- Dynamic shortcuts: 在 runtime 时设置,能够被动态添加移除。只有运行一次才会生效
Adding a static shortcut
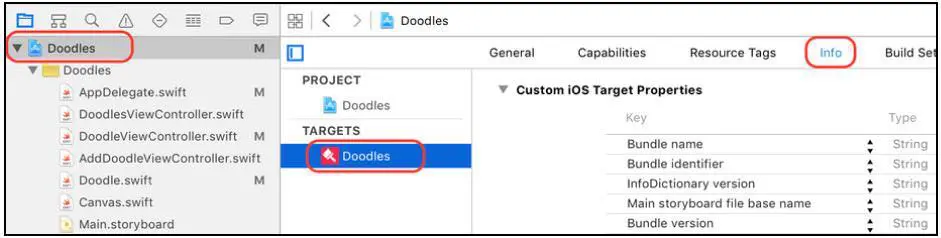
增加一个 key 为 UIApplicationShortcutItems 的 Array,添加一个字典,然后添加下面的 item:

- UIApplicationShortcutItemTitle: 表示 Action 的标题为 New Doodle
- UIApplicationShortcutItemType:
com.razeware.Doodles.new表示唯一的标识符,稍后代码中会用到 - UIApplicationShortcutItemIconType:
UIApplicationShortcutIconTypeAdd表示 Action 为 Add,稍后展示的 icon 也为 Add( + 号)
除了这三个类型的 key 外,通过查看文档还有下面三种 key:
- UIApplicationShortcutItemSubtitle:定义了子标题
- UIApplicationShortcutItemIconFile:用来提供自定义的 icon 图像, 直接传入图片的名字即可
- UIApplicationShortcutItemUserInfo:允许你提供自定义的字典,包含你所需要的内容
现在你已经定义了一个 shortcut item,当用户用力按压图标时,iOS 9 会执行一个新的 UIApplicationDelegate 方法 application:performActionForShortcutItem:completionHandler:
func application(application: UIApplication,
  performActionForShortcutItem
  shortcutItem: UIApplicationShortcutItem,
  completionHandler: (Bool) -> Void) {

  handleShortcutItem(shortcutItem)
  completionHandler(true)
}
我们来实现这个 handleShortcutItem
func handleShortcutItem(
  shortcutItem: UIApplicationShortcutItem) {
  switch shortcutItem.type {
  case "com.razeware.Doodles.new":
    presentNewDoodleViewController()
  default: break
  }
}
根据我们之前在 Info.plist 中定义的 UIApplicationShortcutItemType 唯一标识符来判断是否执行快捷操作,在这里我们快速新建一个新的 VC
func presentNewDoodleViewController() {
  let identifier = "NewDoodleNavigationController"
  let doodleViewController = UIStoryboard.mainStoryboard
    .instantiateViewControllerWithIdentifier(identifier)

  window?.rootViewController?
    .presentViewController(doodleViewController, animated: true,
    completion: nil)
}
最终效果:

当你从 quick action 启动一个应用,application(_:didFinishLaunchingWithOptions:) 依然会被调用,且他的
launchOptions字典中的UIApplicationLaunchOptionsShortcutItemKey会包含这个UIApplicationShortcutItem
Adding a dynamic shortcut
在 Doodle.swift(包含涂鸦的 model) 中增加一个静态方法,所做的事情也很简单,用代码创建一个 UIApplicationShortcutItem 且加入应用程序的 shortcutItems 数组:
static func configureDynamicShortcuts() {
  if let mostRecentDoodle = Doodle.sortedDoodles.first {
    let shortcutType = "com.razeware.Doodles.share"
    let shortcutItem = UIApplicationShortcutItem(
      type: shortcutType,
      localizedTitle: "Share Latest Doodle",
      localizedSubtitle: mostRecentDoodle.name,
      icon: UIApplicationShortcutIcon(type: .Share),
      userInfo: nil)
    UIApplication.sharedApplication().shortcutItems =
      [ shortcutItem ]
} else {
    UIApplication.sharedApplication().shortcutItems = []
  }
}
接着在 addDoodle(_:) 和 deleteDoodle(_:) 更新 model 的操作中都执行下 Doodle.configureDynamicShortcuts(),这样无论新增或删除一个涂鸦,你都会动态更新 shortcut item
除了更新 model,在 App 启动时也要动态更新下,在 application(_:didFinishLaunchingWithOptions:) 添加 Doodle.configureDynamicShortcuts()
最后来处理按下 shortItem action 所要执行的操作:
func handleShortcutItem(
  shortcutItem: UIApplicationShortcutItem) {
  switch shortcutItem.type {
  case "com.razeware.Doodles.new":
    presentNewDoodleViewController()
  case "com.razeware.Doodles.share":
    shareMostRecentDoodle()
  default: break
  }
}

func shareMostRecentDoodle() {
  guard let mostRecentDoodle = Doodle.sortedDoodles.first,
    navigationController = window?.rootViewController as?
    UINavigationController
    else { return }
  let identifier = "DoodleDetailViewController"
  let doodleViewController = UIStoryboard.mainStoryboard
    .instantiateViewControllerWithIdentifier(identifier) as!
    DoodleDetailViewController

  doodleViewController.doodle = mostRecentDoodle
  doodleViewController.shareDoodle = true
  navigationController
    .pushViewController(doodleViewController, animated: true)
}
最终结果:

-EOF-